WHAT’S THE CAMERA FOR?
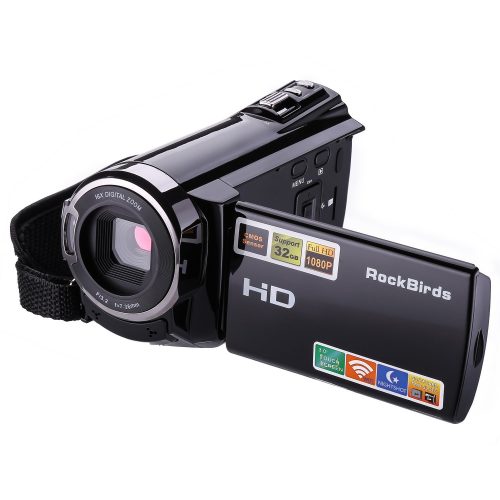 Have you turned up at a coaching session and someone has produced a video camera or mobile phone to “assist in coaching” The owner of the camera “watches” some of the shooters through the camera and then takes it all back into the clubhouse to play to the athletes. If the camera can be set-up & plugged into the TV a review could happen like this:
The “stars” of the show can see that they just look like people shooting or that their shoelace needed tying but they have trouble getting any further effective information from the video.
Was the camera “bouncing about” too much, or picking up general conversations, perhaps focus was on the targets/range rather than the shooters or was it that the operator was filming on one or two specific shooters only?
Within five minutes of so the “stars” and others have lost interest for any number of reasons and are looking to have another shoot or go home!
The loss of interest and the retreat could have been caused by:
• Boredom
• Embarrassment; or
• Peer pressure as the pupils were “copping heaps” from the audience watching the replay.
For whatever reason the opportunity for the coach and the athletes is lost.
So what can we do about this??
When a coach is planning to hold a coaching day for either a group or in a one on one, and it is intended to utilise a camera to assist, then the following guidelines may be of assistance.
Preparation
|
|
|
|
|
|
Location
| The coach should ensure the camera and its operator is located in a position of safety where they will be able to capture the required shots. |
Capturing the shooting
Following on from the coaches requirements above:
| I would expect to see a full-length shot of the shooter to start, zooming SLOWLY onto the feet on the shooting area, and then rising into an upper body shot to capture any movement of the head on the rifle as it is fired. (if that was the intended camera area required) Determine viewing point left / right etc |
| When shooting the video, fill the viewfinder as much as possible with each pupil- there is no point looking for head movement on the firearm or a movement related “trigger flick” problem when the “star” is only a blip in the middle of the screen. |
| To identify and solve a particular problem ensure the operator captures the event in sufficient detail, (and for a sufficient number of shots) for the coach to be able to use the footage to advantage without having to “visualise” the event on the TV during review. |
| When working with a squad of shooters, consider only capturing each shooter as they shoot from a particular lane. Ensure every pupil has an equal opportunity to be “captured” on film. This will not only reduce excessive camera movement but it will also reduce repetition and the period of time taken to review the squad’s footage. |
| If you are coaching “one on one” – keep the recordings from session to session to rate the improvement in style or the mastering of a problem, so ensure you have sufficient video space. |
Review
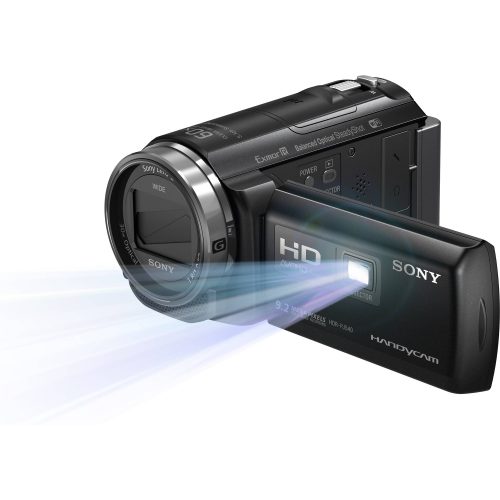
One of the best machines for effective replay is the video camera with its own projector – like this one from Sony. Shoot the film and immediately review on any plain surface.
It is very important to control the review process as individuals may become quite embarrassed having an audience watch them do silly things:
| Limit the initial reviewing audience to the squad of shooters or the individual (if one on one) plus the coach. |
| Attempt to rotate the pupils from the shooting lanes to the TV as soon as possible after the videoed event while the round is fresh in their minds. |
| Allow the pupil to firstly comment on their own technique then have others in the squad comment on each others style (if appropriate) before the coach offers assistance. |
| Remember to respect the feelings of the pupils, be supportive, guide, and reassure as a rough handed report on their style/capability may well loose them from the sport. |
| If you are able to offer repeat sessions on the day then concentrate on the specific concern until it is mastered, resist the temptation to jump around each time picking up other variations as this will confuse the pupil and devalue the result. |
Conclusions
A coach should always reflect on the positive outcome of a video session, as the camera does not lie you will see “we are not all perfect” reaffirm that fact and the benefits of video footage being such a strong reinforcement – “a picture is worth a thousand words.”
Thanks to Colin Witt QLD for additional content in this article
VISION & SHOOTING
SPORTS VISION AND TARGET SHOOTING.
Visual Errors Affect Performance
Accuracy depends on eyes ability to gauge a separation of two objects and recognise symmetry. The rifle shooter requires optimal contrast between the foresight ring and aiming mark – this can be achieved through choice of iris opening, foresight ring size, managing fatigue, eliminating reflections and glare, trialling filters and optimising vision. Proper aiming depends on being consistent in maintaining sight alignment and is dependent on visual acuity (clarity of sight).
Visual Aids
Refractive errors are correctable with shooting frames and lenses, rear sight lenses and contact lenses. Non-reflective lenses protect eyes from annoying reflections. Lenses and filters need to be easy to clean as dusty lenses can cause errors and strain.
Shooting Frames
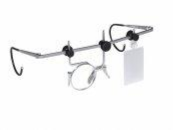 Lens must be correctly centred to avoid distortion – shooting frames and lens holders can be centred before the line of sight regardless of the shooters position. Normal glasses are usually not suitable. Some shooters are choosing to have their prescription in a shooting frame as well as having additional lenses of either +0.25D or -0.25D held in a lens holder before or behind the front sight, these additional lenses are either added or removed depending on the sight picture being influenced by fatigue or environmental conditions.
Choosing Filter Tints:
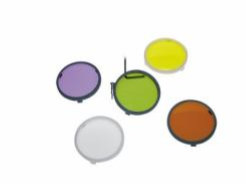 Tints selectively filter light by absorbing it and reducing transmission – for example, amber filters blue light. Light is focussed in a tighter range, chromatic blur is reduced and clarity and contrast are enhanced. There is no consensus on which tints are better to use, however the most acceptable are yellow and orange filters of light and medium densities.
Experimentation in training will provide the answer
As a rule choose the lightest tint you can wear without having to squint or feel uncomfortable and choose the correct tint before competition by comparing the colours on the ground before shooting.
Visual Skills:
Optimal visual skills improve performance and reduces visual fatigue. Even if you already wear prescription lenses or contact lenses, the visual skills you need for optimum sports performance probably need improvement. If you do not require a vision prescription, your visual skills may still be enhanced through vision training.
Visual training can be prescribed to improve visual stamina, focusing, eye movement control, eye teaming, eye hand coordination and mental rehearsal. In shooting, best accuracy occurs when the eye focuses at the foresight and not at the target at the moment of shot release.
Depth of field is the range of distances which the eyes perceives as being in focus. Maximising depth of field allows the eye to concentrate on the sight picture, without constantly trying to shift focus between the foresight and the aiming mark. The depth of field can be improved by adjusting the rear sight aperture.
Seeing Spots Before Your Eyes (Floaters)
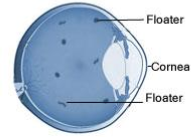 Floaters are minute particles within the eye. They are distracting if on line of sight but are normally ignored by the brain. Floaters appear more often with dry eye and dehydration, also stress and fatigue can bring them into consciousness. An eye examination is recommended. Some simple treatments includes relieving fatigue, treating dry eye, staying hydrated and flicking the eye before firing to move the floaters away.
Dry Eyes Or Sore Eyes
Dry eye blurs vision; degrade image quality and hence visual performance. Treatments include taking vitamin supplements, using tear supplements, cooling eyes with cold compresses, refreshing lids with saline lid cleans and protecting from wind and glare with sunglasses.
Preventing Eye Fatigue
Protect the eye from excessive light. Blacken any bright spots or reflections in the fields of vision, on the surface of the gun or sights. A foresight tunnel can be fitted with extensions front and back to reduce glare. Prevent barrel reflections by covering with cloth tape or mirage band.
During aiming, the same receptors are at work and danger of fatigue is significant. An after-image may occur from fatigued receptors. It is important to manage eye fatigue during shooting by avoiding shifting the point of focus too frequently and avoid prolonged aiming (5-8 seconds maximum). Also blink normally, avoid staring, look away during pauses and rest the aiming eye by scoping with the non-aiming eye. When checking inner position, some close eyes, others prefer to avoid pupil fluctuations by looking down with an unfocussed gaze at a dull surface which has even tones of grey (least photo receptor activity), green or blue.
Full Examination
A full examination is where common eye conditions are detected and treated. The old prescriptions and shooting lenses are measured and compared against the new prescription.
Visual skills are assessed and if required, a program of visual training will be designed to improve the skills required for shooting. A full eye examination should be done at least every two years and is covered by Medicare. No referral is required.
Whatever your Target Sport discipline may be, poor visual acuity will stop you realizing your full potential.
See your preferred optical profession for best advice.
Enjoy the challenge
Tricia
WIND & WIND FLAGS
written by Tricia Van Nus.
Reading the wind is where I have had some of my greatest achievements. Both as a coach and a shooter I have always quietly smiled when others have grumbled and fell, ravaged by the wind…..for me – shooting with top focus, aiming off and a “cat watching mouse” approach have always made the experience thoroughly enjoyable…..sometime frustrating, but enjoyable
That is not to say that I have never felt “blown away” by what lay between the barrel and the target, but I have always felt that elements may have occasionally won the game, or even the set, but never the match!!
For the beginning shooter I hope some of what I have to say can be helpful.
Firstly, no one does consistently well in smallbore shooting without reading or taking notice of the wind flags.
Flags across this country come in a variety of colours, weights and sizes. The ISSF and WRABF Rules determine the required standard.
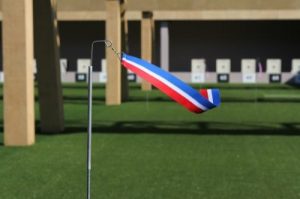
Ideally the flag/s should be able to show movement, direction and strength of the wind on the range, and placed in such a situation that the shooters may see at least a few of them. Should you have 2,4,6 or 8 flags on the range???? My thought – use the flag/s that offer most information, and that is often the ones at 10m on a 50m range. The projectile has determined its path by that distance so having flags at the 50m line is mostly irrelevant…..see Watching the Flags section below.
IT’S WINDY – best solution is to watch others shoot in a detail before yours so you can see whether the wind is going to flick left to right, or simply be gusty and strong.
SOLUTION – 1st solution in the wind is to ensure that your shooting process is 10/10
Nothing sloppy or second best will do.
If the Process is 10/10 then all you need to do is watch for the “when to shoot”
ARE YOU COLOUR BLIND?
That poses some new and interesting problems. With a number of male shooters being colour-blind (often not noticed or detected) there are a new set of challenges. Colour-blindness often comes in the red/green combination, making seeing red flags on green grass rather difficult.
One of our most talented shooters in the late 1990’s had this dilemma. He saw the flags and grass almost as one “brownish” mess and it was only after a lot of reading and bit of experimentation, that we discovered that a magenta filter helped him and clarified what was grass and what were flags.
Solution????
Experiment with filters of varying colours until the contrast is visible. Also talk to your eye professional.
Watching the flags.
The wind closer to you generally has the most effect on the bullet. So it would seem that the flag/s closest to you are most important. This is normally true but not always. If the wind is coming towards you, the flag farthest away will more often show wind changes first. And of course, differing ranges will have their own little quirks. Write these in your diary – it’s valuable information.
Remember your rifle is sighted in for one particular condition (hopefully, after the sighters). Wind changes to that condition will determine where your bullet will go. Say the wind is from 9 o’clock. You are getting 10’s on the target and you’re feeling good. The wind strength increases. The bullet will go right and often a little low (towards 4 o’clock).
So should you
• Hold a little left and a little high for that condition and just shoot? Probably not unless you have been confidently and successfully working on the concept of aiming off in your training (ask your coach about that concept)
• Wait?? Yes briefly – maybe the original condition will come back in a bit. Best that you just watch the range conditions and wait for a moment to see what happens. Keep busy with good positive thoughts while you are waiting and watching. Keep an eye on the match timing as there is nothing worse than a rushed 5 shots to complete the detail/march
• Change the sights. Should the change seem to be permanent, then use your training knowledge, adjust your sights and fire a very good shot. This will give you valuable information about the wind change.
The condition change I gave is a simple one – just a wind strength increase. However, the wind could have stayed the same velocity but shifted direction a little. More than likely it will do both at the same time! If you have watched and waited, and waited, and waited, then don’t be afraid to utilise the sights!!!! Based on your knowledge gained in training, you will be confident to make good sight corrections. Yes there are going to be times when the changes are very quick and you miss it – stay sharp and focused. Anger and frustration only compounds the effects of the elements.
Remember when the wind blows and/or the rain belts down…
• Keep your thoughts positive and take a diary down with you if you need to record how many clicks you adjust on the sights. Yes – with everything else going on, shooters often forget where they are, and once you are half way into a match (or even a 20 or 25 shot card) it is easy to forget where the sighter zero is.
• The other shooters are also in the same range with you – they have their own little challenges happening as well.
• Keep the flag/s in the one quadrant where possible and try for consistency in firing the best shot you can.
• You probably cannot see all the flags on the range, so watch a couple in your bay carefully, rather than all of them haphazardly.
• The shots will move with the wind and the rain……work that to your advantage.
• Rain will often “drop” the shots, just as wind will move them – learn from each shot.
• Keep your shot quality very high – good process has the greatest chance of being good score outcome.
• Use the time before, or in between details, to watch what is happening on the range. Be prepared – see how fast the flags move, or in what general directions.
• Scope one of the “experts” for a bit and see what the flags are doing when they shoot – can you see their pattern??
One last thought that many shooters avoid……
Train in all conditions – wind, rain, hail or sun
TRAIN YOUR BRAIN
BRAIN TRAINING
Training comes in many forms depending the sport you have selected.
For shooting the best physical training for the sport is swimming and exercise similar to Tai Chi. Add to this walking one kilometre a day with breathing exercises by inhaling through the nose and exhaling through the mouth.
Swimming because it builds the upper chest and shoulders to the point that the shooter athlete has little difficulty in holding an 5-6 kg rifle on target for the completion of each match.
Swimming also strengthens the lungs including mastering mental control of lungs, which is most important. Swimming has advantages for two main reasons, first the centre of balance of any human is located at the hips or pelvis and the legs provide the muscle strength (gained through kicking in swimming) for maintaining the body balance through out the shooting procedure, and secondly the upper shoulders and arm muscles are strengthened for holding the rifle in position.
Natural Tai Chi is excellent for perfecting mental control over the neuromuscular movements of each coordinated movement during the exercise. Tai Chi is not a martial arts style of exercise but a Chinese exercise combination used for the purpose of physical unity and the practice of mental control through intensive concentration.
The shooting athlete can, through Tai Chi or its equivalent mental practice, formulate the correct responses with appropriate actions and file same into the memory ready for later use.
Next we address some important functioning elements of the “Mental Processes”.
- Mental practice and analysis.
- Mental practice with dry-firing.
- Live firing validation.
Phase 1. Mental practice and analysis. Whether we acknowledge it or not, while we are shooting, any given shooting function performed is being constantly and minutely analysed and filed into memory for later use. It is during automatic functioning (ie a match) that the brain extracts this data from memory and puts such required functions into effect, hence we remember how to shoot!!!. This information is constantly being updated and over-written. The learning phase occurs during training and then filed into memory…… The value of good training and practice cannot be over-stated!
Phase 2. Mental practice used with dry-firing practice. During the mental analysis we have unwittingly analysed and stored the function/s (remember that sometimes some of the stored information is not necessarily beneficial due to other factors, however we often store it anyway….humans being humans…and the next skill is to filter what is gold and what is gravel) Next we must filter and exercise what we have learned and placed into memory. Dry firing is routinely used for this purpose as it provides many positive scenarios if tackled correctly.
During this “dryfire” the timing and rhythm sequences can be practices and smoothed. The effort also renews the mind and assists with the refinement of the overall shooting technique.
Phase 3. Dryfiring validation requires live firing. Live fire results is a report card of how well the shooting athlete has accomplished the refined shooting technique in combination with the mental skill and attention to win. The shooting athlete is that athlete’s sole competitor, no one else.
One other item that many do not realise is the relatively short time the mind has to act upon any given function. It is very quick because of the design of the mental entity. How long you can hold your attention on any given item tends to control how long you can perform valued mental practice or dryfire training. There is a point beyond which dryfire training purely becomes muscle holding practice – take care to note the balance.
When we shoot….
We use the condition of heightened attention and then move to intensive deeper concentration. Heightened attention is the state you normally use during the set up of position and natural point of aim – external factors come in here.
Intensive concentration occurs from the 2-3 second mark of the mental checklist to trigger release (this state often lasts 5-6 seconds and no more). Then you return to heightened attention which is not intensive concentration…Are you confused now?
For many years, neuroscientists have generated evidence that brain activity helps to shape brain architecture. Now, scientists have used sophisticated imaging techniques to demonstrate and prove this theory. These experiments have us closer to understanding how the wiring of the brain is established and modified by mental analysis and experience.
“Seeing is believing.” We have the understanding of how the brain responds to stimulation such as mental practice and dryfiring training sessions – the Scatt machine assists here as the shooter and coach see the results. Stimulation can be originating externally or internally during training sessions. Learning memory is developed over a 5 to 30 minute period and will last in temporary memories from a 20-minute period to a 2-hour period. Long-term memory takes many repetitions of these periods of mental practice and dryfiring periods. There are simply no short-cuts!
Dryfiring may be boring but if the shooting athlete does not mentally absorb every aspect of the shooting position and shooting technique, the brain activity will not occur and shooter learning will stall.
All mental absorption must be conducted with correct, perfect or model examples to allow the brain to build upon this basic correctness. It is of little point to analyze that which is less than the best possible.
Utilise the power and learn from your brain….there are no short-cuts.
Embrace the challenge….
TO CANT OR NOT TO CANT
What is “canting?”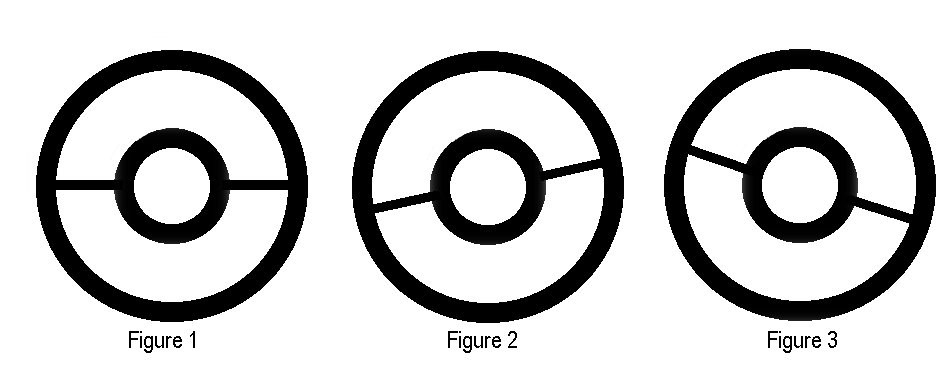
Canting is about shooting while the rifle is not perfectly level. The rifle can be canted inward (brought in towards the shooter) or outwards (away from the shooter). The diagrams above give you a view of the sights when the rifle is level (Figure 1), canted in towards the shooter (Figure 2) or canted outwards (Figure 3)
In order to attain great scores, Position Shooters (and even Prone shooters) often do something that flies in the face of the “old way” – that is, canting the rifle.
Many think that canting will cause poor shooting, and it may well do, if the cant is inconsistent, but with standing position especially, inward canting can help give better scores.
How can this be?
In order to shoot well, a shooter must be relaxed and stable. A shooter is more relaxed if the head is held upright. More importantly the shooter must have good balance.
As an experiment, try standing upright with your heels together and close your eyes. Feel your body moving – this normal and natural. Now do the same thing and tilt your head to the side. You should feel much more movement. So, when shooting standing, the best idea is to stand erect and bring the rifle to you. This also applies to all other disciplines, therefore keeping the head as upright as possible, is the primary goal.
In order to see through the sights you will need to cant the rifle, rolling it towards you. This same canting often applies to prone and kneeling.
The outward cant is not used, as it destroys the stability of your position, and you tend to feel as if you are going to fall over, whether standing, kneeling or prone. Check your position soon and see if you have the tendency to “roll-over” or outward cant. NO OUTWARD CANT PLEASE.
If you find that this is happening,
then for PRONE
check your forward arm – is it too far to the left
perhaps your trigger arm is a bit wide
perhaps your body needs to move over a bit to counter to roll
then for STANDING
check your trigger arm – is it too close to your ribs
does the hand grip fit you well – perhaps you are dragging the stock
does the cheek piece need adjusting
is your neck bent towards the rifle – this will affect the ears and balance
then for KNEELING
check your elbow on the knee area
is the bent leg too close, or too far away from the supporting leg
is the rifle resting correctly on the palm
Is there a set or perfect cant?
Not at all. As stated above, all the shooting positions, and standing in particular is all about balance and stability. Your coach will advise you, and no doubt emphasise these few simple rules for canting:
- Reliable canting is a learned skill to ensure your body comfort and stability. Train for it.
- Remember to maintain a consistent cant – do the same for every shot, not just when you remember!!! A spirit level on the barrel is worth the money here. Watch it!
- Learn sight alignment while canting (your normal N, S, E, W becomes more NW, SE, EN, WS) or more easily….purchase one of the adaptable sights
- Adjust the rifle (especially the butt plate) to accommodate the cant
- Write the settings in your diary
Now its up to you – have fun.
THINKING DURING A MATCH
THINKING DURING A MATCH thoughts by Tricia Van Nus
 TO THE ATHLETE: The Range Official has said the magic word ….”start”…. you shoot your sighter groups and are happy with those – now to the match shots ….. it is only then that you notice little changes occurring in your tough “ready to go” approach.
someone’s talking back there ……… I’m hungry …….. has that flag picked up a bit
“my position is rock solid”………… “my sights are crystal clear”……. “each shot I fire is smooth”
Of course, as is with many things, using cue words or phrases only works if you have trained with this approach. It’s also an advantage if you are the kind of person who relates well to these image cues.
- Have a plan – know what you want to achieve – both short term and in the longer term and then stick by it
- Pay attention to those details over which you do have control
- A score is not the only indicator of performance level – it’s your process that counts more in the longer term
- Stay working on those parts of your performance that matter – smooth breathing, solid position, clear sighting, hold and reliable trigger release and follow-through
- Do nothing more and nothing less than the performance of your best model shot
- Give yourself a pat on the back when it works, and a slight nudge to get back on track if it slips
- You are your own motivator during a match
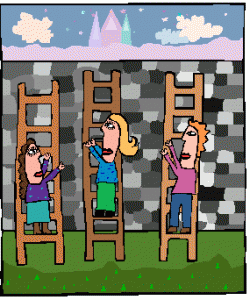
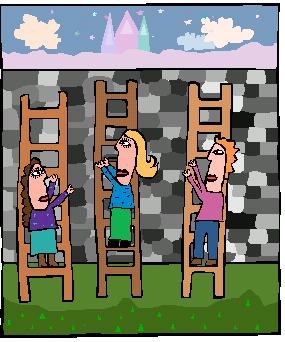

“To see over the wall (ie outcome),
one must first climb the ladder
and take each step in order (ie process)”..
- Ask athletes to target factors that can be controlled, eg an athlete cannot worry about the result of the competition or the weather because they cannot control it, but they can nominate such things as good position, clear thinking, and careful attention to detail.
- Design and implement individual goal-setting plans – both long and short term. The athlete will then have a better idea of the grand picture and where this competition fits into the scheme of things
- Discuss individual goals – every match has a goal
- Learn how and when to best leave the athlete who wants space – be available so they may seek you if required, yet not be “in their face”
- Learn simple key sentences for the talkative athlete – they want to express themselves not just hear a series of statements from you
- Assist the athlete in dealing with both winning and losing, eg when they win they should attribute success to their hard work in training, and their reliable match process. When they don’t, they must pay tribute to their effort, show a willingness to continue working hard to improve, and look forward to the next opportunity to compete.
- Encourage participation in the right spirit.
TESTING AMMUNITION
TESTING AMMUNITION.
In June 2011, Robyn Ridley, Warren Potent and Dane Sampson visited the Eley factory in the UK, with the aim of testing their (and other) barrels to determine the best batch of ammunition to use over the coming year. Many other shooters have also repeated this trip in the years since – to their benefit obviously.
Obviously, the data on these pages will not specifically help other shooters , as each barrel has a particular brand and batch that works best in that barrel. However, it does show quite a range in a particular barrel—which batches work well, and those that really don’t.
So– what is involved in testing at Eley? For starters, a lot of time! Each person must do the hard yards, and just put bullet after bullet into their barrel, letting the computer record group size and placement.
 How it the rifle barrel secured. As you can see, it is a reliable clamping system to hold the barrel.
After an initial round of testing, the “best batches” are noted, and another round of testing is under way. From this next round of testing, more attention is paid to those batches that appear to work.
However, that is not the end of the story.
More testing, and higher scrutiny of group size and shape.  It is not purely about the group size, as seen here at right. The group sizes at 17.1 and 17.2—very close, however the shape of the group differs greatly.
Remembering that each barrel has its own special requirements, and noting that all the groups in this article were from the same barrel, so as to not confuse the issue, one needs to also look at the range of the group sizes, From 15.8–20.3
 Which batch would you discard first? Also note the shape of the 19.5 group—quite fair at first glance, but three or four shots are definitely well out of the group….that batch’s out as well. The ammunition was not tested in the field, and it is common for some variances to occur once outside the closed testing range (often better!)
However, common sense would suggest that an ammunition that is shooting very tight groups in the test situation, will probably shoot well on any range, given that the shooter is competent.
The shooter whose groups I have illustrated above, obviously decided to go with the batch that produced the groups…consistent and small……
If the barrel will shoot groups like this with this ammunition, then there is more chance that the group sizes will remain close to the factory, when shot out of the shoulder and on the open range.
I firmly believe that everyone can, and should take the time to test the ammunition that they have purchased. While in Australia we do not often have the option of selecting batches, we can at the very least, know the potential capabilities of the ammunition in the barrel.
Now to hear from one of the shooters – Robyn….
 Warren, Dane and I arrived bright and early in London and then had a rather cold and rainy (typical England) drive up to Birmingham where the Eley factory is located. We were there for two days to test our barrels. Each barrel takes about 2 hours (if you’re quick) and the factory can test two at a time.
For testing, there were 23 batches of Tenex available to us. It is also useful to bring along to Eley, 50 rounds of a batch currently being used, as a ‘test’ group. This works by establishing a benchmark group first, and will also tell you whether you’ve found anything better than the batch you’re currently using.
This is not absolutely necessary, especially if you have not been using one consistent batch, however it is useful. If you’ve been shooting scores you like with a batch you’ve been using, and then find a better batch, it gives you a great deal of confidence that the ammo will be giving the best possible on match day.
We all started by shooting 10 shot groups with these 23 batches, then eliminated all those batches that did not group well, eg had shots out of the group etc and choose the best groups to keep testing. In my case I has 11 batches that I wanted to test again.
With those batches you want to test again, you go on to shoot another 30 shots to form 40 shot groups to compare against each other. To compare, you get a print out of how all the batches tested in your barrel, including the initial 10 shot group and the 40 shot group size, total score and a breakdown of how may of each score (10.9, 10.8, 10.7 etc) are in the group.
After comparing, I decided that there were 4 batches that worked quite well in my barrel, The trick was then deciding which one was the best!
In the end I decided on a group that was round, a high score and one that did not score less than a 10.3
Just choosing the smallest group may not always be the best, as groups will often get tighter shooting out of the shoulder anyway, so you also have to consider the shape of the group (shots left and right to far out are a definite no-no, high and low shots, within reason, can usually be accounted for due to the clamp and can disappear back into the group when shooting from the shoulder) and score you would achieve using that batch of ammunition.
It is important to note how different all the barrels we tested were, and that just because one batch tested well in one barrel, certainly didn’t mean it would test well in another.
Luckily for us, all our barrels tested very differently and we didn’t have to argue over who would get the ammunition from a particular batch. Especially lucky for Warren and Dane that their barrels didn’t test the same as mine, as I decided to take all remaining stock of the batch my rifle particularly liked.
The two days of testing at Eley were a good experience and it did reinforce how much I like my Anschutz barrel, as it has always been fairly consistent with testing, and again I found a number of batches that worked quite well.
After watching 6 other barrels being tested, I know that a non-fussy rifle barrel is quite a blessing!
Although all this happened many thousands of kilometers away, the process can be replicated at home here in Australia. Sydney and Adelaide ranges both have reliable clamps that can be used for testing.
There may not be quite as many batches to choose from in Australia, yet finding the ‘best of the bunch’ for your rifle is an important part of improving scores and going into a match with far greater confidence.
Enjoy the challenge
Tricia
SWISS BALL WORKOUT
WORKING WITH SWISS BALLS
Let’s continue in that “physical improvement” theme with a little work with the SWISS BALL. They are simple to purchase, and easy working with them. How?
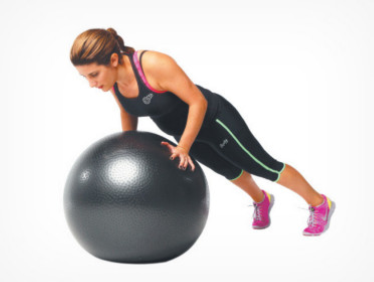 First—have your feet roughly shoulder width apart. Grip the ball also shoulder width apart, and then slowly bend your arms so that the chest is almost touching the ball, (keeping your back straight) then return to the position where your arms are straight.
Place both hands on the ground, shoulder-width apart. 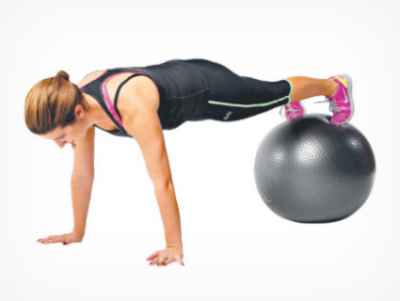
Place one shin on a Swiss ball, then the other, so you are holding a push-up-type position. Try not to let your hips sag. Keep your feet apart to help with balance. When you get the hang of this exercise on your shins, try resting on the fronts of your feet, and when you master that, try doing it on your toes (pictured right)
 Lie on your back. Place the soles of your feet on a Swiss ball, knees bent to 90 degrees. Keep your arms by your sides on the ground, palms facing up. Pressing your feet into the ball, raise your hips off the ground until your body forms one line, from your shoulders to your knees. As you reach the top, clench your buttocks to accentuate the work of your gluteal muscles. Lower to a few centimetres off the ground, then rise again for your next rep.
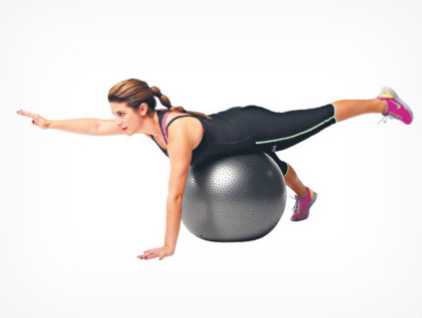
This next exercises requires your obliques to work to keep you from rolling sideways off the ball. How? Lie with your stomach on a Swiss ball. Place your fingertips on the ground in front of you and your toes on the ground behind you. Brace your core to stop the ball pushing into your stomach and to steady your torso. Keep your head position neutral and your spine long. Lift your right arm and left leg at the same time until they are horizontal.
Hold for a few seconds, then lower. Repeat with the opposite arm and leg.
With all of these exercises—try to keep the ball still through all the reps
Complete sets of 5 to begin with, and then build to 10 or more.
Enjoy …and many thanks to “Body & Soul, Swiss Ball Workout”.
STRETCHING & SHOOTING
STRETCHING FOR SHOOTING—yes I can the groans and moan from here. However I’m not sure that many appreciate the benefit that stretching will afford their bodies.
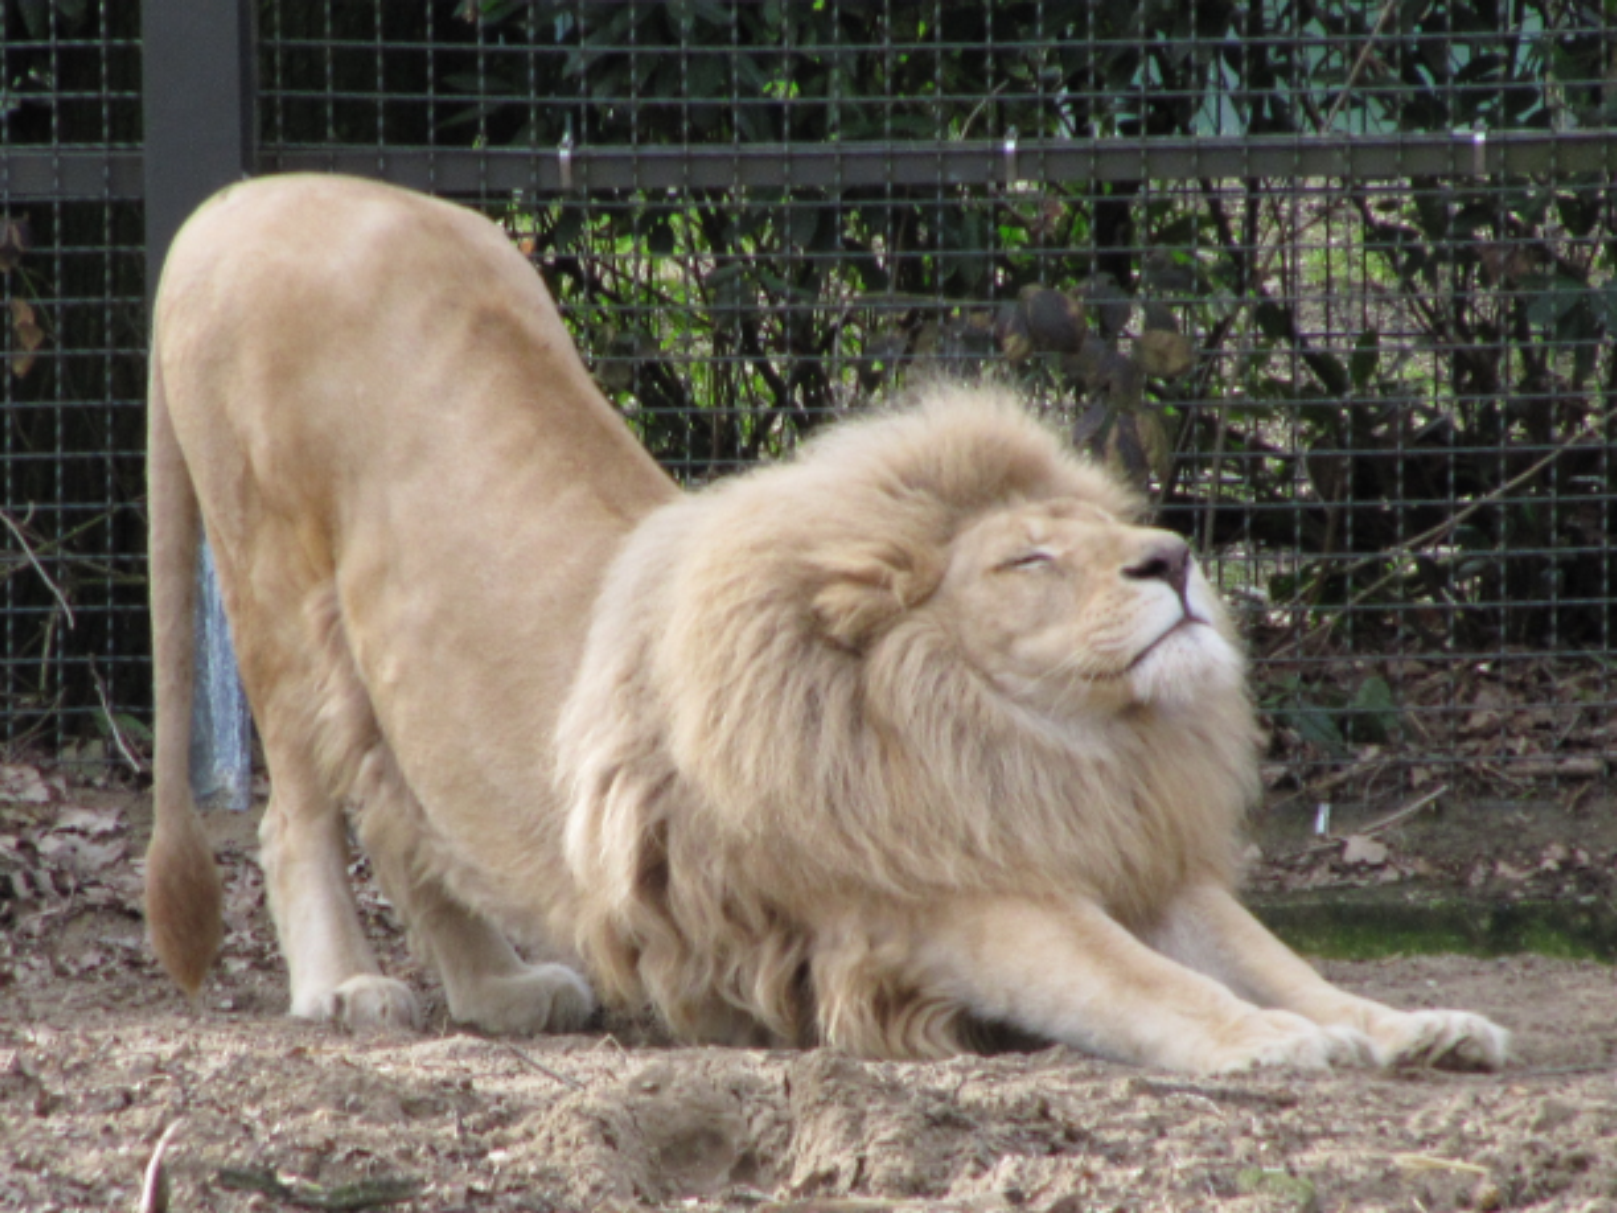 We heard it all before, yet a glance along most ranges will show that, although the message is out there, the challenge is unheeded.
How many times have we heard… “I finally settled into the position by the 9th shot or so”
And why is this??? Well, obviously the body was not physically ready to shoot.
A warm body is a responsive body, an alert body and a body that is ready to meet the demands of shooting.
And of course those prone and F Class shooters will be thinking— “yes this stretching stuff is OK for the other shooters, but we don’t need it” Well think again. Imagine assuming your prone position while you are standing up on two feet. It’s a most unusual position—muscles really stretched, arms in odd places indeed.
Now consider a body that has been warmed and stretched prior to commencing the actual shooting.
A warmer and stretched body promotes good blood circulation, and the mental benefits of that are amazing, ensuring that the body is less likely to be under stress, and this assists in injury prevention.
A quick bit of “thinking of good process and good shots” while stretching will work wonders.
So—now you’re convinced! Where to start. The essence of an effective stretching program works on the principles of:
- A general warm-up is essential prior to stretching
- Stretches should be undertaken in an ordered fashion…ie head to foot or foot to head
- Stretches should be held for a minimum of 15 seconds to gain the maximum effect
- Stretches should be complementary (ie forward stretch and then backward stretch)
- An effective stretch routine takes as little as 5min before shooting
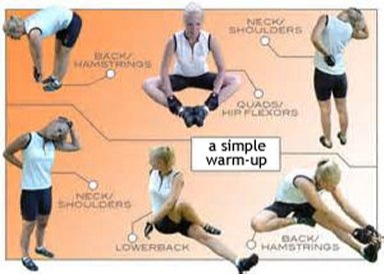
A quick look at Google will provide numerous posters on stretching, and articles on the “best stretches”. There is also material on the TRA website.
WHEREVER YOU FIND THE INFORMATION—START STRETCHING
Enjoy the challenge
Tricia
STAYING IN FOCUS
Staying in Focus
Staying focused on what you need to do in order to overcome the obstacles in front of you, is a main ingredient to reaching success.
You may have never heard of Karoly Takacs, but in the 1940’s he was well known in Hungary as a national hero. Everyone who knew his story was inspired by it, after reading his story you will never forget his success and how he made it happen. As a right handed pistol shooter, he had national success, then his right hand was badly injured when a faulty Army training grenade exploded. Takács was determined to continue his shooting career, and switched to shooting with his left hand.
When Karoly Takacs showed up at the 1939 National Championships, many of his friends and other shooters greeted him with open arms and were excited that he came to watch them shoot. They were surprised when he told them that he was there to compete, not to watch. They were even more surprised when he won!
Things looked like they were back in order for Karoly. He was now the talk of the shooting communities and his dream of going to the Olympics were once again a reality. This reality of going to the Olympics was once again short lived. The 1940 and the 1944 Olympics were cancelled, due to World War II. It looked like Karoly’s dream of going to the Olympics was not meant to be. He would continue his training over that eight-year period and at the age of 38 he would qualify for the 1948 Olympics.
Before the rapid-fire pistol event Carlos Enrique Diaz Saenz Valiente, the former World Champion and the current world record holder and favourite to win the event, asked Karoly why he was in London England.
The reply that Karoly gave was a humble one, “I’m here to learn.” Karoly not only won the gold medal, but he beat Carlos Valiente’s world record by ten points. During the award ceremony, it is said that Carlos looked at Karoly and said, “You have learned enough.” Karoly would also repeat as Olympic Gold medalist four years later in Helsinki Finland.
The more you think about something happening you improve the probability of that thing happening. This is what Karoly Takacs did better than anyone else. He focused constantly on what he needed to do and needed to happen to make it a reality.
Never doubting what he could achieve, but focusing on what he needed to do in order to put himself in position to achieve his goals. His story is one that is told throughout the international shooting communities around the world.
While many will use his story as one that proves you should never give up, I think it’s Karoly’s ability of constantly thinking about what he wanted and what he needed to do to get it that is the bigger lesson learned.
-
SUCCESS IS A CHALLENGE